
Sloped yards are common across Connecticut and nearby New York, and they're where fence installs most often go wrong. A fence is built straight, but the ground isn't. Treat a slope like a flat yard, and you'll get uneven lines, visible gaps, and posts that work loose over time.
Here's the most important thing to know upfront: installing a fence on a slope usually comes down to choosing between a stepped fence and a racked (contoured) fence.
Stepped installation is typically best for steep or uneven terrain. Racked installation is usually best for gentle, consistent slopes.
What's In This Guide
Quick Facts
- Use stepped fencing for steep or uneven slopes.
- Use racked (contoured) fencing for gentle, consistent slopes.
- Stake the line and measure total drop before setting posts.
- Dig deeper downhill, keep posts plumb, and brace corners/gates.
- Transition at a post when the slope changes instead of forcing one method.
Technique #1: Level (Topline) Fence
A level or topline fence keeps the top rail perfectly horizontal from one end to the other. The posts are set at varying heights to maintain that straight top line, while the ground underneath slopes away.
Visually, this creates a clean, uniform skyline. Structurally, it means the bottom clearance increases as the terrain drops.
Best Use Cases
- Decorative fencing where symmetry matters more than ground contact
- Front-yard installations where a straight visual line enhances curb appeal
- Situations where pets, small children, or security gaps are not primary concerns
- Mild slopes where bottom gaps remain minimal
- It is less ideal for steep slopes or privacy fences where ground-level visibility matters.
How To Install
1. Establish a Fixed Elevation Reference
Run a tight string line between corner posts at the intended top height. This line becomes your visual guide for every post and rail.
2. Set Corner and End Posts First
Dig to stable depth and set posts plumb. On sloped yards, ensure embedment depth remains consistent even if the visible post height varies.
3. Measure Down From the String Line at Each Post Location
This ensures the top of every post aligns perfectly with the level reference.
4. Install Rails and Panels to the Level Reference
Keep checking with a level to maintain horizontal alignment.
5. Evaluate Ground Clearance as You Move Downhill
Measure bottom gaps early. If they exceed your comfort level, consider minor grading adjustments before finishing.
Common Challenges (And How To Avoid Them)
Large Gaps Beneath Downhill Sections
Avoid surprises by measuring bottom clearance before installing every section. If gaps exceed 4 to 6 inches and containment matters, this method may not be appropriate.
Uneven Visual Height From the Street
If the fence parallels a sloped sidewalk or driveway, the level top line can appear visually uneven from certain angles. Preview the line from multiple viewpoints before committing.
Structural Stress From Shallow Downhill Posts
Do not shorten embedment just because more posts are exposed downhill. Posts must be equally secure regardless of grade.
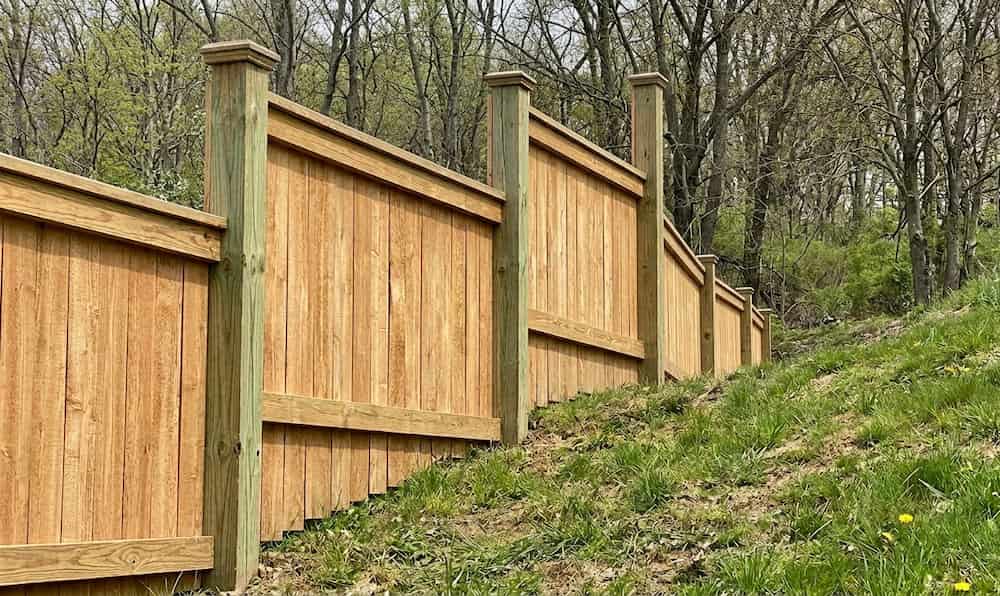
Technique #2: Stepped Fence
A stepped fence keeps each panel level but lowers each section incrementally as the terrain drops. Think of it as a staircase pattern moving down the slope.
This method is commonly used for privacy fences and steeper grades because it maintains consistent panel geometry without forcing panels to angle.
Best Use Cases
- Steep or uneven slopes
- Long privacy fence runs
- Wood, composite, or rigid panel systems
- Areas where structural stability and clean horizontal lines matter
How To Install
1. Map the Full Run Before Digging
Stake the entire fence line and measure total elevation change from start to finish. Divide that total drop by the number of sections to determine an approximate drop per panel.
2. Establish Your First Reference Height
Set your starting corner post to the correct finished height. Run a string line to visualize how the fence will step down the hill.
3. Set Posts With Consistent Embedment Depth
Even if the visible height changes, each post should be set at proper depth. On the downhill side, dig deep enough to ensure stability and prevent shifting over time.
4. Install the First Panel Level
Use a 4-foot level on the top rail. Confirm it is straight before securing permanently.
5. Drop to the Next Step Intentionally
Measure the planned drop before installing the next section. Keep the drop consistent unless the grade changes significantly.
6. Check Alignment Frequently
Step back every few sections. The staircase pattern should look intentional and evenly spaced.
7. Manage Bottom Gaps Early
If triangular gaps become large, address them during installation with minor grading adjustments or compatible bottom treatments rather than waiting until the end.
Common Challenges (And How To Avoid Them)
Inconsistent Step Heights
Avoid adjusting each section independently. Pre-calculate your drop schedule to maintain visual uniformity.
Large Triangular Openings
The steeper the slope, the more pronounced the gap. If containment is critical, confirm stepped fencing will still meet your needs.
Downhill Post Movement
The downhill side carries more soil pressure. Proper depth, compacted backfill, and adequate curing time are essential for long-term performance.
Technique #3: Racked (Raked/Contoured) Fence
A racked fence angles each panel so it follows the natural contour of the land. Instead of stepping down in sections, the entire panel tilts to match the slope, reducing visible gaps at the bottom.
This method produces a smoother visual flow and is often preferred on gentle, consistent slopes.
Best Use Cases
- Mild to moderate, consistent slopes
- Yards where minimizing ground clearance is important
- Aluminum or vinyl systems designed for racking
- Properties where a seamless appearance is preferred
How To Install
1. Confirm the Rack Range of Your Panels
Before digging, verify how much vertical change each panel can accommodate. Exceeding the rack limit can distort spacing or weaken connections.
2. Lay Out the Fence Line Precisely
Stake and string the entire run. Because the fence will follow the grade, straight alignment is critical for visual consistency.
3. Set Posts Plumb and Properly Spaced
Even though panels will tilt, posts must remain vertical. Double-check spacing to ensure panels fit without forcing them into place.
4. Dry-Fit a Panel Before Finalizing Multiple Posts
Attach one panel temporarily and adjust it to match the slope. This confirms the angle works and bottom clearance is acceptable.
5. Rack Panels Gradually Along the Slope
Adjust each section incrementally rather than forcing a large angle at once. Secure hardware once the panel sits evenly along the grade.
6. Plan Transitions Carefully
If the slope changes direction or steepness, you may need to introduce a stepped section. Racking works best when the slope remains consistent.
Common Challenges (And How To Avoid Them)
Forcing Panels Beyond Their Design Limits
Never bend or over-torque rails to match the ground. If the slope exceeds the rack range, switch methods.
Uneven Picket Spacing or Distortion
Check alignment from multiple angles. Small errors are more noticeable when panels are angled.
Gate Complications
Gates typically do not rack. Install gates on flatter sections or adjust surrounding panels to create a workable transition.
Tools and Measurements Needed for Quality Installation
The Basic Tool Kit
- String line and line level: Keeps your fence line straight and helps you hold consistent heights across posts. It also prevents the common mistake of letting panels “wander” visually as the grade changes.
- Measuring tape (25 ft minimum): Essential for repeatable post spacing and consistent step drops.
- 4-foot level: Helps you do two different jobs: keep posts plumb and keep stepped sections truly level.
- Post hole digger or auger: On sloped yards, clean, vertical holes matter because angled holes make posts easier to push out of plumb.
- Stakes and marking paint: Lets you map post locations and preview the step pattern before you commit to digging.
Measurements That Matter Most on Slopes
- Post spacing: Even small spacing errors stack up quickly on sloped runs. Measure between post centers, not “by eye.”
- Plumb posts: A panel can be stepped or racked, but the posts should remain vertical. This keeps hardware aligned and reduces long-term leaning.
- Consistent step drop (stepped fences): Decide your drop per section before you start. Even if the ground varies slightly, a consistent pattern usually looks more intentional than constantly reacting to the grade.
- Bottom clearance: Measure it early and often. For racked fences, clearance tends to be more uniform. For stepped fences, clearance will vary and needs a plan (grading, bottom boards, or design choices).
Why Hire Expert Fence Contractors for Sloped Yards
Sloped installs leave less room for error. Experienced fence contractors help you avoid costly rework by handling the details that most DIY projects miss, including:
- Accurate slope measurement and a layout plan that stays consistent from end to end
- Proper post depth and stability, especially on the downhill side, where movement is more likely
- Clean stepped or racked alignment that looks intentional, not “wavy”
- Tight gap control for privacy, pets, and pool-area safety needs
- Gate planning on uneven grade so swing clearance and latches stay aligned over time
Frequently Asked Questions (FAQs)
What is the maximum slope a racked fence can handle?
It depends on the fence system. Many prebuilt panels have a limited “rack range,” meaning they can only angle a certain amount before spacing distorts or hardware won't seat properly. Check the manufacturer's specifications before you buy or dig.
Do I need to cut fence pickets for a racked installation?
Usually not. Most racked systems keep pickets vertical while the rails angle, so pickets don't require trimming. Custom wood installs may still need minor adjustments at transitions or where the grade changes.
How do I prevent a sloped fence from looking “wavy” from the street?
Use a string line for alignment, keep post spacing exact, and commit to one visual strategy per segment: either consistent step drops (stepped) or consistent bottom clearance (racked). The wavy look typically comes from switching approaches mid-run without a planned transition post.
Should I slope the bottom of a privacy fence to match the yard?
On gentle, consistent grades, a racked approach can follow the slope and reduce gaps. On steeper grades, stepping often looks cleaner and keeps panels square, but you'll need a plan for the gap beneath each section.
What's the best way to handle a slope that changes direction?
Break the fence line into segments, transition at a post (not mid-panel), and use the best method for each segment. Many successful installs rack the gentle sections and step the steep or irregular sections.
Get a Fence That Fits Your Slope and Your Property
For homeowners and property owners who want the job done right the first time, Connecticut Fence & Gate in Litchfield County brings the experience and craftsmanship needed to handle sloped terrain correctly.
Our team can design and install a fence that enhances your property's security, appearance, and long-term value.